In my previous post, Building a wired pop-up event network, I explained how I designed and deployed a high-throughput wired network in an event space (including suggestions on packing and organization to speed deployment and teardown). In this post, I’ll explain how my team and I created a wireless network to go alongside it.
This video about my team’s event gives a quick overview of the networking challenges we overcame:
Wireless networking challenges
The biggest challenge in deploying a wireless network to this environment is the many types of clients that need to perform well in the room. These clients include obvious devices like laptops, smartphones, and IoT devices. In addition, we also needed to optimize the airtime so that both low- and high-power clients could have a positive experience. We had to make sure all these clients were allocated enough bandwidth to perform their tasks as needed. Typically, when you deploy a wireless network, it’s understood that there’ll be a trade-off between throughput performance and capacity. However, you can mitigate this trade-off in a number of ways, such as our strategy of intentionally over-provisioning wireless access point hardware.
We used UniFi devices in our networking setup, as described in the previous post. UniFi provides their own guide for High-Density Wireless Networks, which provides information on similar topics.
Channeling
When you deploy a wireless network, channeling is a key concept you’ll need to keep in mind. Like the term suggests, channeling involves choosing which channels that each access point will transmit on. With UniFi equipment, this step frequently means setting multiple channels for each device (one channel for each wireless radio). It’s important to choose channels that don’t overlap to ensure a high-performance network.
2.4 GHz wireless networks
When you’re trying to manage a high-performance, high-throughput, high-capacity network, supporting 2.4 GHz wireless frequencies is essentially impossible. 2.4 GHz is prone to interference from many common sources, from microwaves and baby monitors to Bluetooth devices. Since it only has 3 distinct channels, using this frequency also limits the ability to design adjacent cells (the area covered by a single access point) .

In our event network setup, we don’t deploy a 2.4 GHz network unless there is a specific need for an IoT device that doesn’t support 5 GHz. In that case, we take a single lower-capacity access point, turn its transmit power down, and place it on the table of the team who needs it. This approach reduces the size of the wireless cell down to the area of the group that needs to use it.
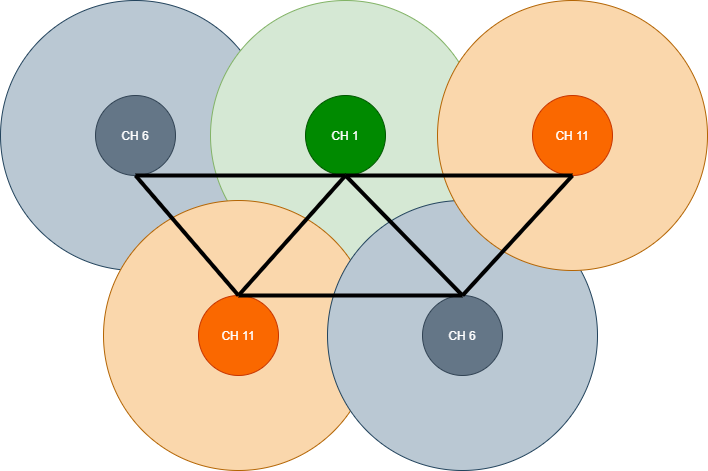
The best way to channel a 2.4 GHz wireless network is to build a grid of interlocked triangles, which use one frequency at each vertex:
5GHz wireless networks
It’s significantly easier to build a high-performance, high-throughput, high-capacity 5 GHz wireless network in comparison to a 2.4 GHz one! With a 5 GHz network, you can choose between channel band widths of 20, 40, and 80 MHz. (Ignore 160 MHz in real-life situations, because it’s currently unreasonable for most devices.) The larger the band width, the higher the bandwidth! However, when you increase that number, the signal is more prone to interference, and reduces the number of distinct channels available.

For our solution, we chose 40 MHz because it’s a good middle ground between the nearly interference-free option of 20 MHz and the high-throughput option of 80 MHz. 40 MHz also provided a reasonable number of channels for us to design our wireless cells around.
You can choose between 4 sets of allocated frequencies for 5 GHz channels, called the U-NII (Unlicensed National Information Infrastructure). In the UNII-2a and UNII-2c channel allocations, the use of Dynamic Frequency Selection (DFS) is required by law. DFS is a spectrum-sharing system, which is required to ensure that 5 GHz wireless networks can coexist with radar. DFS ensures the network does not interfere with a radar signal. When a signal is detected, the access point ceases transmitting on the problematic channel, restarts, and selects a new frequency. In the UniFi software, all DFS channels are marked with “(DFS)”.
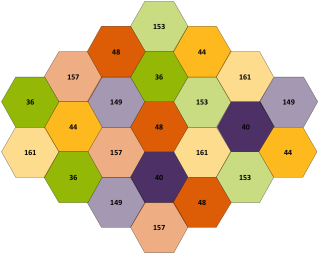
When channeling 5 GHz, you can use the same strategy you do with 2.4GHz networks. That is, you can create a layout where none of the available channels overlap the others. The UniFi map tool can help with this by approximating the transmission distance of the access point; however, in my personal experience I’ve had mixed results with this tool, so take it with a grain of salt. An example channel layout for 40 MHz channels in a 5 GHz network might look like this (actual signals will obviously not occur in a perfect hexagon):
DTIM intervals
By default, the DTIM (Delivery Traffic Indication Message) interval for both 2.4 GHz and 5 GHz is set to 1. This means that a DTIM is sent with every beacon, keeping client radios awake indefinitely, and creating excess client traffic. However, modern equipment and its power saving radios can struggle with a DTIM value that is too low and disconnect from the wireless network periodically. As a result, we set our interval to 3, which was a value that seemed to provide the best performance, especially on iPhones.
Minimum RSSI and cell size tuning
UniFi provides two tuning methods to manage the physical size of a wireless cell. These are called Minimum Relative Signal Strength Indicator (RSSI) and Cell Size Tuning.
RSSI is a logarithmic measurement of signal strength between a client radio and the transmitting access point. Specifying a minimum value forces clients whose interference on a given access point exceeds a certain threshold (thereby degrading the signal strength of the device) to be disconnected and reconnected to another, closer, access point. In our system, we use -67 dBm on half of the devices and -65 dBm on the other half. We do this to avoid contention for clients at the exact midpoint of multiple access points. There is a “strict” option to force clients to disconnect when they violate this threshold which we use to prevent clients from “deciding” to be sticky to an access point themselves.
Cell Size Tuning is a similar metric to Minimum RSSI that operates in a slightly different way. While Minimum RSSI emphasizes the use of signal strength to select access points when multiple are available on the same SSID, Cell Size Tuning measures the level of interference which will be transmitted over instead of trying to change channels, effectively dictating the level of ambient interference that needs to be overcome. We didn’t use Cell Size Tuning, because it’s recommended to either use Cell Size Tuning or Minimum RSSI with strict mode (we preferred the latter option).
Airtime fairness
Airtime fairness divides the available spectrum into lanes, which helps provide all wireless clients with an equal experience. This policy prevents small groups of users from overusing the wireless network. Each access point limits the number of clients which can connect to it based on how much transmit/receive time it can allocate for each client.
As a result, slower clients with less data to send will operate at a lower priority compared to faster clients who need to move larger amounts of data in the same space. This approach effectively increases the overall throughput of the wireless network at the expense of those slower clients.
Limiting multicast and broadcast traffic
Limiting multicast and broadcast traffic from being exchanged between the wired LAN and wireless network is almost mandatory in a high-density hybrid environment. This step helps prevent the wired clients from accidentally eating up wireless spectrum space with ultimately useless data. Similarly, narrowing the scope of ARP requests is also necessary to eliminate needless client network chatter.
Data rate limiting
One key aspect of wireless network tuning is to try to minimize the amount of time/spectrum space spent on management traffic. You want to get beacons sent as quickly as possible, but slower clients connected to the access point can hold up this process.
Setting the minimum data rate accomplishes two key objectives:
- It makes the client radio maintain at least a specific data rate to stay connected to the access point. This is similar to minimum RSSI. If the client can’t maintain the data rate with the access point in question, it might be able to do so with a physically closer access point.
- It forces beacon traffic to happen at 6Mbps (on 5GHz) instead of 1Mbps. This means less airtime is spent handling signalling beacon traffic. Instead, airtime can be dedicated to real data transfer. This is very important in establishing a minimum bar of “quality” for the clients on the wireless network.
Smart queues
UniFi has a QoS feature called “Smart Queues.” This feature uses the speed of the internet connection to provide quality of service to all clients (wired and wireless). For wireless clients, this feature is important because it provides a better way of prioritizing what should be low-latency traffic, such as a SIP circuit or streaming media.
Balancing signal strength
When you’re managing a network during an event, you’ll need to make changes on the fly as people (and their clients) move around the venue. This means you’ll need to balance the signal strength of each cell. You can try to prepare for this before the event starts. However, once there are hundreds of people inside the venue, the environment changes. In our case, we had access points that pointed inwards from the walls (instead of just being hung from the ceiling). Since people are — from a wireless design standpoint — just bags of water, they absorb some of the radio waves and change the boundaries of the wireless cells. When people walk around the venue, we need to either build automation to monitor the changing ambient signal strength of each access point, or try to estimate a configuration that will work well enough for the venue. The latter method is what I’ve described in this post.
Further thoughts
Deploying a high-performance, high-density wireless network in a hurry is far from impossible. However, this process involves a lot of specific tweaks and an understanding of the environment that really only comes from repeat deployments and making mistakes. Hopefully, this guide might be helpful to others who want to design a similarly powerful network solution for their own events!
Have you been thinking about doing a similar pop-up wireless event network? If you’ve already done one, what challenges have you faced and overcome?

One thought on “Building a wireless pop-up event network”